How to unlock a Windows 10 computer in new ways via Windows Hello

Understand how to log in to Windows in new ways via Windows Hello


How Windows Hello works
  1. Windows Hello is the latest innovation in protecting your devices. Instead of using a password to sign in to your devices, apps, online services and networks, it uses ‘biometric authentication’. This means that you sign in with your face, iris or fingerprint. You can also use a PIN or even a picture if you prefer.
  2. The Lumia 950 and 950 XL are currently Windows Hello ready, with more devices supporting Windows Hello due to be available in the future. However, even if you don’t have a Lumia 950, you can still set up a unique picture or PIN to log in.
  3. If you decide to stop using Windows Hello, the identifying features of your face, iris or fingerprint will be deleted. This information never leaves your device and Windows does not store it anywhere.
How to set up Windows Hello

  1. If you’d like to set up Windows Hello on your phone, swipe to the ‘All apps’ list from Start   and then go to Settings > Accounts > Sign-in options. If you don’t see an option for Windows Hello, your phone doesn’t support it. You may need to input your PIN to continue. Select ‘Set up’ under Windows Hello and follow the instructions.
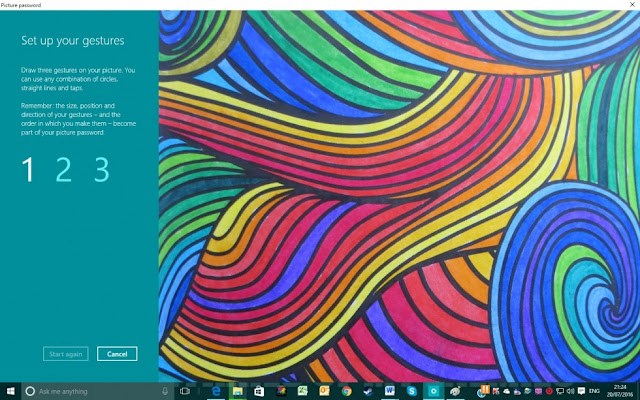
  2. If you’d like to set up a picture password or pin on your computer, click on Start   and then go to Settings > Accounts > Sign-in options. If you don’t see Windows Hello as an option, but you’d like to set up a picture password, click on ‘Add’ under picture password.
  3. If you are setting up a picture password on a computer, type in your Microsoft account password and then browse to find the picture you want to use. 
  4. Use your mouse to draw three gestures (circles, straight lines or taps) on the picture. These gestures will become your log in password. You will then be asked to repeat these gestures to confirm. You can start again or cancel at any time.
  5. Once you’re happy with your picture password, click on ‘Finish’.
  6. To turn off Windows Hello, go to Settings > Accounts > Sign-in options and deselect ‘Automatically unlock the screen if we recognise you’ or ‘Remove’ to get rid of a picture password.
  7. If you want to remove your identification data, go to Settings  > Accounts  > Sign-in options and select ‘Remove’ under Windows Hello, select Remove.
Now we know how to use Windows Hello and picture passwords to add extra protection to our computers or phones. Feel free to explore other Windows 10 features in our collection of guides.
Comments

Popular posts from this blog

How to Remove Powered by Blogger – Attribution Widget?

In this article, I will be demonstrating how to remove or hide attribution widget ‘Powered by Blogger’ in footer of blogger blogspot blogs.  Before going to the process,  backup your blogger template , while editing html code if anything goes wrong or template modified design doesn’t work or looks good you can restore from backed up template.  Here I have demonstrated you two methods for removing attribution widget. Some blogger templates may not support method 1 then you need to follow method 2 for successfully removing attribution widget. Method 1: Remove ‘Powered by Blogger’ by unlocking Attribution widget Step 1 : Go to your blog “Template” | click on “Edit HTML”. Step 2 : Here on drop-down “jump to widget” option and select Attribution 1 as shown below Step 3: After selecting Attribution 1 widget you will be able to see this line <b:widget id=’Attribution1′ locked=’true’ title=” type=’Attribution’>  on your blogger template. Step 5: Once done click on ‘Save template’. Step 6

Free file hosting server for your blogger 2020 April 30

Free file hosting server for your blogger 2020 April 30 Hey guyz come in my website take free server for your blog. There are many free server which i have collected for you. 1. Free hosting server.net https://googleweblight.com/i?u=https://www.freehosting.com/&hl=en-NP No information visit this site 2. I page.com https://www.ipage.com/wordpress-hosting?utm_medium=affiliate&utm_source=747219&utm_campaign=&#038;LinkName=ha194098053441348  Information Price : 3.75$ Disk space : unlimited Domain name : 1 year free 3. Green greeks.com https://www.greengeeks.com/wordpress-hosting  Information Price : 2.95$ Disk space : Unlimited SSD Domain Name : 1 year free 4. Wix.com https://www.wix.com/lp-lang/mobilewebsite Information : Price : 0.0$ Disk space : 600Mb to 20Gb Domain name :Transfer 5. Google Drive https://www.google.com/drive/ Information Price : free just login on your account Disk space : 15 GB

Easy 12 steps to solve standard Rubik's Cube (3*3*3)( Fully explained with solution of flip doubts and all )

Easy 12 steps to solve standard Rubik's Cube (3*3*3)  First of all , let us tell you in brief about Rubik's cube . It contains  Six faces of Six different color {Blue , Green(opposite to blue) , red , orange (opposite to red) , white ( usually taken as reference color) and yellow (opposite to white) }  To make you easy ,we have given easy name for the layers and  moves of cube : (NOTE : A Center color of cube never moves so below mentioned  color facing towards you , to the right , left , up, down  and back is a center color which is in the middle of each layer )  FRONT LAYER F ( Front): The front layer of cube is facing towards you . If F  move is to be done then , move the front layer in clockwise  direction . F' ( Front prime ): If F' move is to be done then , move the front layer in anti-clockwise direction BACK LAYER B ( Back ) : The back layer is just opposite to the front  layer.  Suppose , if we take blue as front layer ( layer facing towards  you )  then